Pixelate images online
Open the full image pixelator when you want to pixelate images quickly and download a clean PNG.
Core toolBrowser image pixelation toolbox
Upload an image, pixelate images without sending the file to a server for processing, inspect the palette, and jump into focused tools for screenshots, faces, redaction, and pixel art.
Image processing for the editor runs in your browser. Ads and analytics remain enabled on the site.
Use this starter editor to pixelate images, compare the blocky output, read image dimensions, and download a PNG or simple grid reference.
Start with a clear photo, icon, screenshot, or artwork. Processing happens locally in this browser session.
Choose the tool that matches what you need to do instead of forcing one editor to handle every image privacy or pixel art task.
Open the full image pixelator when you want to pixelate images quickly and download a clean PNG.
Core toolUse a region editor when only one part of an image needs masking and the rest should stay readable.
Privacy workflowConvert photos or icons into palette-limited pixel art references, then build grids for craft or design work.
Creative workflowPixelation is helpful when the visual result matters, but sensitive text should be handled with stronger redaction.
Pixelate images to soften a product mockup, hide a visual detail, or turn a photo into a blocky reference before sharing it online.
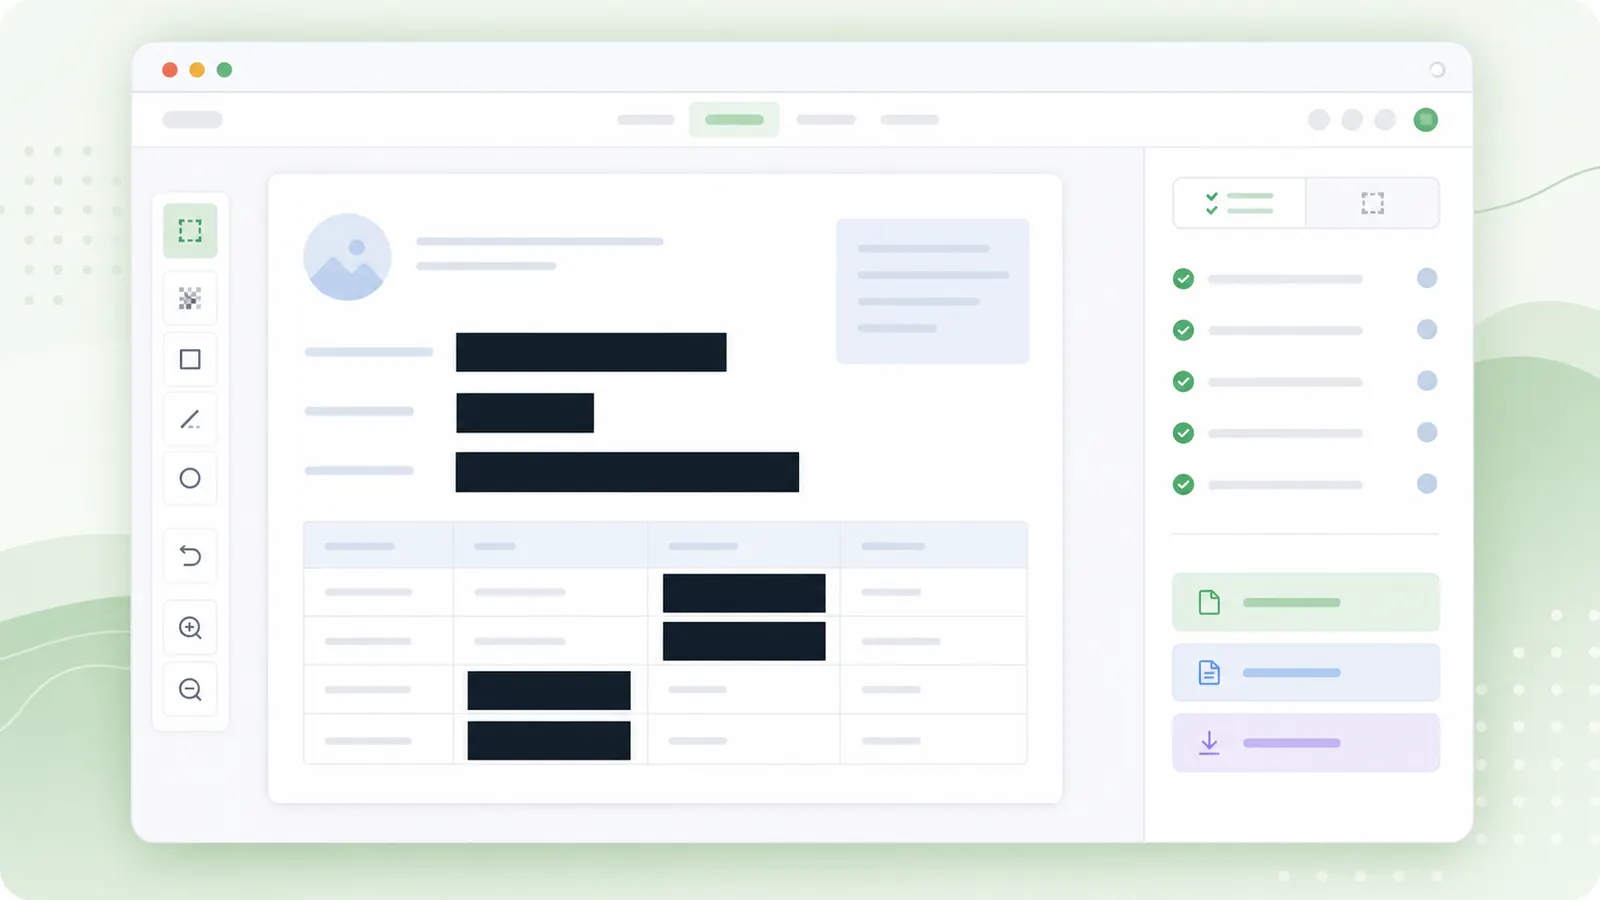
For passwords, API keys, ID numbers, legal data, medical data, or bank details, use solid redaction instead of relying only on blur or pixelation.
A practical process helps you get a useful output instead of a muddy block of color.
Start with a clear image and review the source dimensions before choosing a grid size.
Turn color reduction on when you want fewer tones for a cleaner pixel-style reference.
Palette swatches can be copied after the preview renders.
Use pixelation for visual masking, but switch to solid redaction for secrets, credentials, IDs, or private records.
Use solid redactionAnswers for people who need to pixelate images quickly and choose safer masking when needed.
Image processing for the editor runs in your browser, so the image file is handled locally for the tool preview and download. The site still uses ads and analytics.
Use solid redaction for passwords, API keys, ID numbers, bank details, legal data, or medical data. Pixelation is useful visually, but it is not the strongest privacy method for sensitive text.
You can download a pixelated PNG and a simple grid reference that includes palette information for design or pixel art planning.
Use the homepage editor for quick pixelated previews.
Move to a focused page when you need redaction, screenshot blur, face blur, or pixel art output.
Use solid redaction for highly sensitive information.